 |
VOOZH | about |
|
VOOZH | about |
The R programming language provides a powerful set of tools and packages for creating interactive 3D plots and animations. One such package is RGL. In this article, let us learn How to create 3D plots and animations using the RGL package.
The RGL package in R provides an interface to the OpenGL graphics library for creating interactive 3D plots and animations. It is built on top of OpenGL, the popular 3D graphics library that is widely used in computer graphics and game development. Using this package, we can provide animations to the 3D graphs. We can use Rgl Package to rotate the graph on its different axis.
The first step is to install the RGL package in R, which can be done by writing the following code:
install.packages("rgl")Let us see step by step, how we can create a 3D plot in R and also provide animation to it using the RGL package.
Step 1: Install and load the Rgl package
First, we will install and then load the RGL package in our R script.
install.packages("rgl")
library(rgl)
Step 2: Create a data frame
Create the dataframe that contains the variables to be plotted on a 3D graph. We can also use R's inbuilt datagrams such as iris, mtcars, etc
data <- data.frame(x = c(1, 2, 3), y = c(4, 5, 6), z = c(7, 8, 9))
Step 3: Create a 3D scatter plot
After loading the dataframe, we will plot the graph using the plot3d() function and pass the attributes that we want to plot on the graph as parameters.
plot3d(data$x, data$y, data$z)
Step 4: Add labels to the axes
To make the graph more readable and understandable, we can label the axis using the axes3d() function, which takes a list of labels as the parameters.
axes3d(labels = c("X-axis", "Y-axis", "Z-axis"))
Step 5: Customize the graph
We can also customize the graph with various options such as colors, point sizes, and shapes to make it more representative.
plot3d(data$x, data$y, data$z, col = "red", size = 3, type = "s")
Step 6: Create animations
The final step would be to add animations to our graph using the play3d() function, which takes the spin3d() to specify on which axis the graph should rotate and the duration of the animation as the parameters. The default value of spin3d axis is c(0, 0, 1) which will spin the plot on z axis.
play3d(spin3d(axis = c(0, 0, 1), rpm = 10), duration = 10)
Now let us see a few examples to understand the concept.
In this example, we first generated some data and then plot it on the graphs using the persp3d() method, which takes the x, y, and z coordinates and a 'col' argument that defines the color of the graph.
Output:
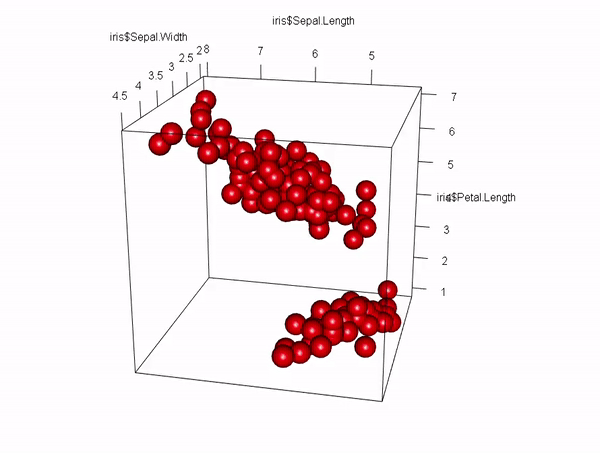
In this example, we take R's inbuilt dataset 'iris' as the input and then plot it on the graphs using the plot3d() method, which is used to plot the scatterplots. It takes the Sapel Length, Sapel Width, and Petal Length as the x, y, and z coordinates respectively, a 'col' argument that defines the color of the graph, size of the points of the scatterplots, and type as 's' which means spheres.
Output:
The RGL Package in R also provides us with various functionalities to customize our 3D plots. We can change the size, color, and shape of the points plotted on the graph, as well as add a bounding box to it. Let us see a couple of examples to customize the plots.
In this example, we customized out the plot by adding a background color to it using the bg3d() function. We also used the Points3d() function to plot the points on the graph and the lines3d() function to add x, y, and z-axis lines and provide them with different colors. Lastly, we added an animation to the graph using the play3d() function which rotates the graph on the x-axis.
Output:
In this example, we plot the lines instead of points or spheres using the plot3d() function with the type argument as 'l' which indicates lines. The bbox() function is used to add the bounding box to the graph and we provided the col to blue as the arguments which will be the color of our bounding box.
Output: