 |
VOOZH | about |
|
VOOZH | about |
Access control and authentication in MongoDB secure the database by verifying user identities and enforcing role-based permissions to prevent unauthorized access and protect data integrity.
To secure your MongoDB instance, follow these steps in the specified order to successfully enable authentication and access control.
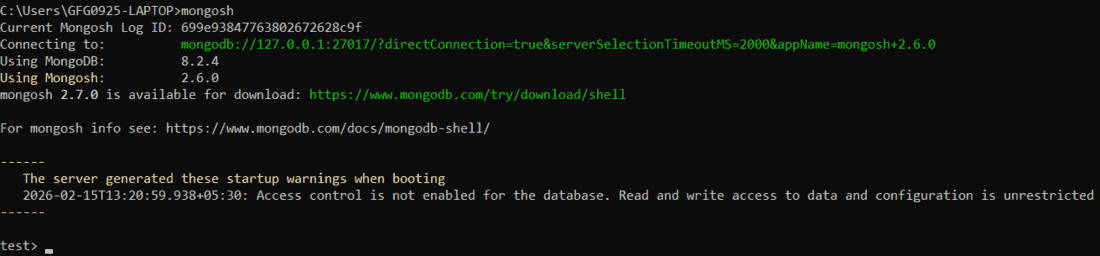
Start the MongoDB server by opening the command prompt and running the following command.
mongod Output:
👁 mongoshAs we can see that the database has been started and we can access it.
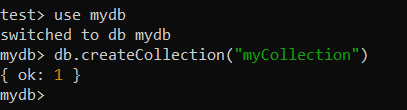
Create a database using the command prompt or MongoDB Compass to use GUI. The database is created automatically when you create your first collection.
use mydb //Creates databasedb.createCollection("nameColletion") Output:
👁 Screenshot-2026-02-25-114937Once we have successfully created a database, it's time to insert few documents into the database.
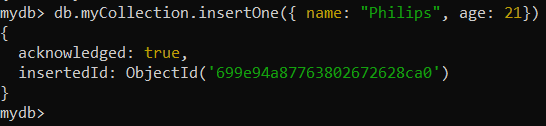
db.myCollection.insertOne({ name: "Philips", age: 21})Output:
👁 Screenshot-2026-02-25-115036Using the same format, you can create database & collection and insert additional data as needed.
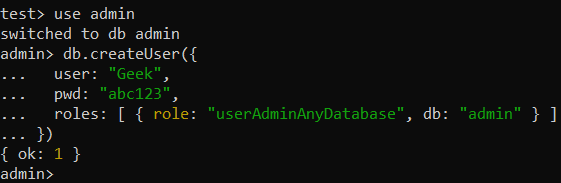
To enable authentication, create users and assign them appropriate roles based on responsibilities. Avoid giving unnecessary privileges to application users.
use admin

db.createUser({
 user: "Geek",
 pwd: "abc123",
 roles: [ { role: "userAdminAnyDatabase", db: "admin" } ]
})
Output:
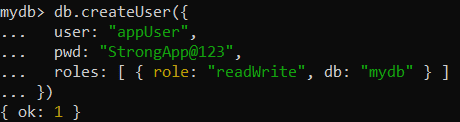
Create an Application User (for data access)
use mydb

db.createUser({
 user: "appUser",
 pwd: "StrongApp@123",
 roles: [ { role: "readWrite", db: "mydb" } ]
})
Output:
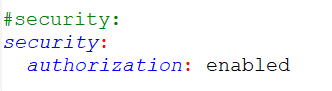
👁 Screenshot-2026-02-25-122255By default, MongoDB authentication is disabled, so you must edit mongod.conf to enable access control.
C:\Program Files\MongoDB\Server\8.2\binOpen the mongod.conf file in any editor and write the following under security
security:👁 Screenshot-2026-02-25-120115
authorization: enabled
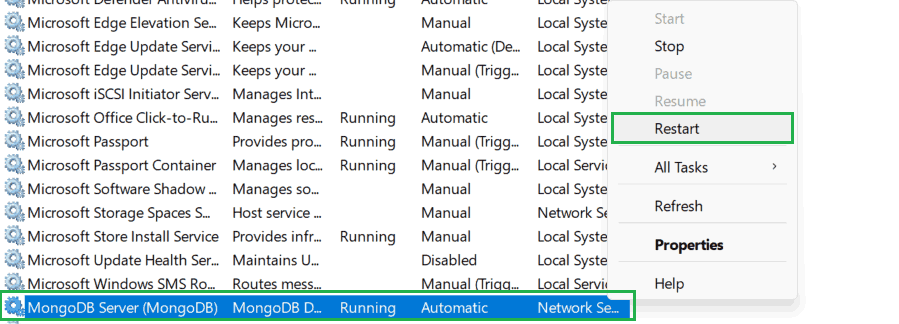
Save the changes and close the file. Once we have made the changes, Go to Services in Windows and find MongoDB and restart it.
👁 Services-in-WindowsAfter restarting MongoDB, try accessing the data without authenticating. For example, attempt to fetch documents from the myCollection collection:
db.myCollection.find()Output:
👁 authorizationThis confirms that authentication and access control are enabled.
Now to see the data, let's first give theusername and password.
db.auth("appUser","StrongApp@123")Output:
👁 Screenshot-2026-02-25-122124Check for the available documents in the database.
db.myCollection.find()Output:
👁 Screenshot-2026-02-25-122159As we can see after successful authentication, we get access to the documents available in the MongoDB database.
Set the MongoDB URI in your application’s configuration file to include the database credentials:
mongodb://appUser:StrongApp@123@hostname:27017/mydbThis allows the application to authenticate with MongoDB after access control is enabled.
Restart the application to reload the updated configuration and apply the new MongoDB connection settings.
MongoDB provides a localhost exception that temporarily allows user creation without authentication when access control is enabled and no users exist.