 |
VOOZH | about |
|
VOOZH | about |
Epoxy is an Android library developed by Airbnb for building complex RecyclerViews with ease. It allows a flexible, easy to use approach to creating lists, improving the process of creating and managing complex, dynamic UI components. Epoxy enables the building of RecyclerView layouts in a declarative style, giving developers the ability to manage various data types and UI elements more efficiently. Instead of dealing with custom ViewHolders, adapters, and layouts manually, Epoxy abstracts the entire workflow and simplifies much of this work.
Epoxy leverages model-based UI development (where each view in the UI is treated as a model object) to allow developers to create efficient, reusable, and maintainable UI components. In this article, we will know about how to implement the Epoxy with DataBinding.
Refer to the previous to know more about EpoxyModels and EpoxyController: Epoxy RecyclerView Library in Android
The Epoxy library has several advantages that makes it more preferable for production:
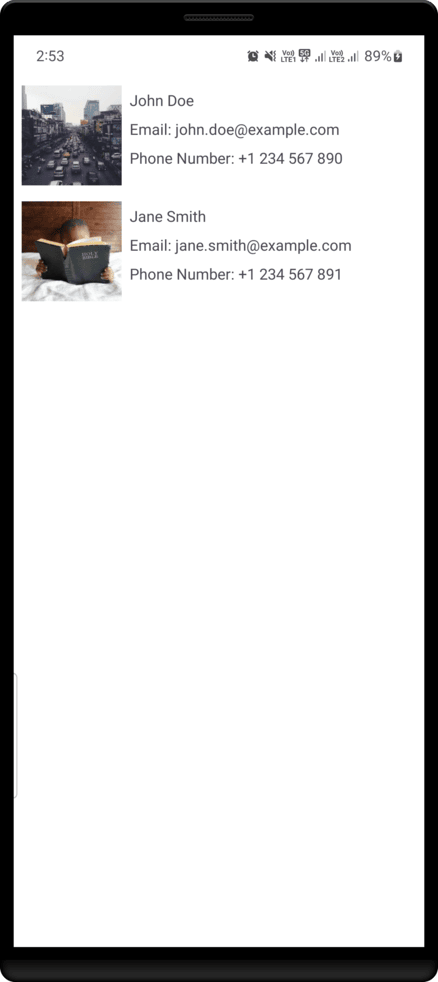
Epoxy Groups are a feature that allows you to group related items within an EpoxyController. This concept allows developers to organize lists into sections or categories, making it easier to handle complex layouts. Groups are often used to display categorized data or distinct sections in a RecyclerView. For example, if you are building a list, you could group three textviews, with an ImageView. The groups allow you to visually separate data for a cleaner and more structured UI.
Navigate to Gradle Scripts > build.gradle.kts and add the following code under the android{} scope for DataBinding support:
android {
 ...
 buildFeatures {
 dataBinding=true
 }
}
Add kapt plugin under the plugins() scope
plugins {
 ...
 id("kotlin-kapt")
}
Add the dependencies for Epoxy under the dependencies{} scope
dependencies {
 ...
 implementation("com.airbnb.android:epoxy:5.1.4")
 implementation("com.airbnb.android:epoxy-databinding:5.1.4")
 implementation("com.airbnb.android:epoxy-annotations:5.1.4")
 kapt("com.airbnb.android:epoxy-processor:5.1.4")

 //Glide - optional (for image loading)
 implementation("com.github.bumptech.glide:glide:4.16.0")
}
Check for the updated version of the epoxy library from here.
Also, add the following code at the end of the file separately
kapt {
 correctErrorTypes = true
}
Navigate to app > kotlin+java > {package-name}, right click on the folder and select, New > Kotlin Class/File and name the file User.kt. This file will contain a data class that will be used to store user data as a reference. Now, add the below code to the file.
User.kt:
Epoxy allows you to create "models" that define the views in your RecyclerView. You can use the @EpoxyModelClass annotation to define a model. Since we are using DataBinding, we will also use the @EpoxyAttribute annotation to bind data to the views.
Create a Kotlin file with the name EpoxyModel.kt and create two Epoxy models, each for a Text and Image as shown below.
EpoxyModel.kt:
Now, let's create the layouts we have defined in the EpoxyModels. Navigate to app > res > layout, right click on the folder and select, New > Layout Resource File and name the files as user_essential.xml and user_info.xml. Add the following code to the files.
Create a Kotlin file with the name EpoxyBinding.kt and add the following code to the file. This code defines a Data Binding Adapter that allows you to easily load images into an ImageView using the Glide image loading library directly from your layout XML files.
EpoxyBinding.kt:
The EpoxyController is responsible for managing the data and controlling the Epoxy models. You can subclass EpoxyController and define how the items are displayed. In this controller:
We have also introduced groups in this file, that groups views based upon your choice. Now, create a Koltin with the name EpoxyController.kt and add the following code to it.
EpoxyController.kt:
Now, let's create the layouts we have defined in the EpoxyController. Navigate to app > res > layout, right click on the folder and select, New > Layout Resource File and name the files as group_container.xml and nested_container.xml. Add the following code to the files.
Navigate to the MainActivity.kt file and setup the EpoxyRecyclerView by populating it with data as shown below. Given below are the code for MainActivity.kt and corresponding layout file activity_main.xml.