 |
VOOZH | about |
|
VOOZH | about |
In this article, we are going to build a grocery application in android using android studio. Many times we forget to purchase things that we want to buy, after all, we can’t remember all the items, so with the help of this app, you can note down your grocery items that you are going to purchase, by doing this you can’t forget any items that you want to purchase. A sample image is given below to get an idea about what we are going to do in this article.
Note that we are going to implement this project using Kotlin language.
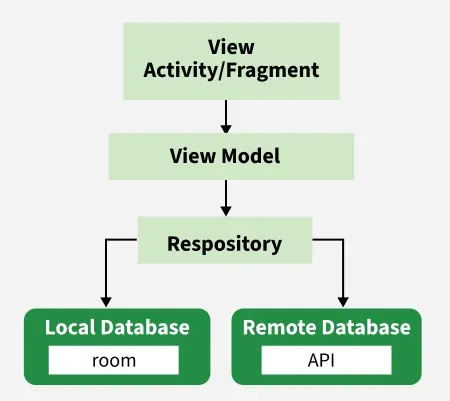
In this project, we are using MVVM (Model View ViewModel) for architectural patterns, Roomfor database, Coroutines and RecyclerView to display the list of items. Before jumping to the project let’s understand these terms.
To create a new project in Android Studio please refer to How to Create/Start a New Project in Android Studio.
Note: Select Kotlin as the programming language.
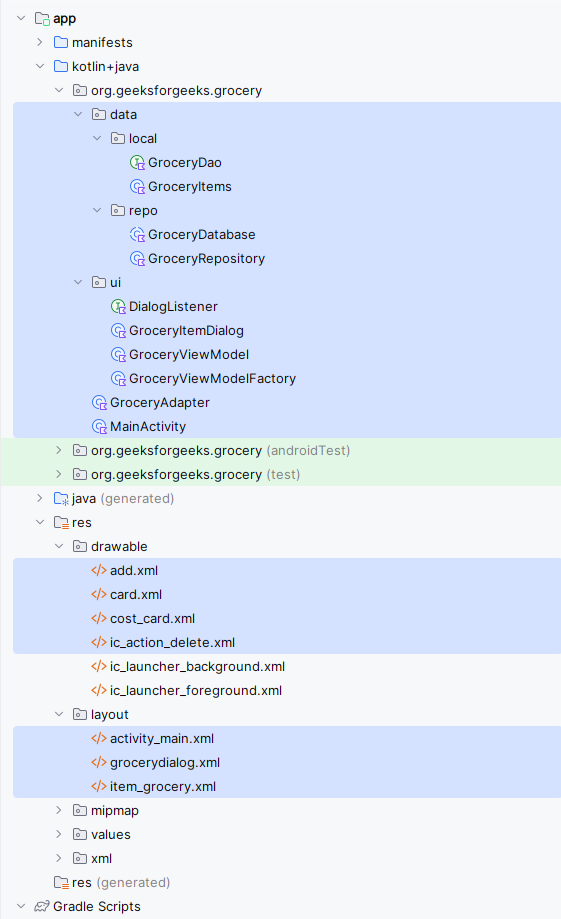
Below is how the project structure will look at the completion of the project.
Add these dependencies in your gradle file and also apply the plugin as 'kotlin-kapt'. To add these dependencies, navigate to Gradle Scripts > build.gradle.kts (Module :app).
Apply kotlin-kapt plugin in the plugins{} scope.
plugins {
 ...
 id("kotlin-kapt")
}
Now, add the following dependencies under the dependencies{} scope.
dependencies {
 ...

 // Room and Architectural Components
 implementation("androidx.room:room-runtime:2.6.1")
 implementation("androidx.legacy:legacy-support-v4:1.0.0")
 implementation("androidx.lifecycle:lifecycle-extensions:2.2.0")
 implementation("androidx.lifecycle:lifecycle-viewmodel-ktx:2.8.4")
 implementation("androidx.room:room-ktx:2.6.1")
 kapt("androidx.room:room-compiler:2.6.1")

 // Coroutines
 implementation("org.jetbrains.kotlinx:kotlinx-coroutines-core:1.7.3")
 implementation("org.jetbrains.kotlinx:kotlinx-coroutines-android:1.7.3")

 // ViewModel
 implementation("androidx.lifecycle:lifecycle-extensions:2.2.0")
 implementation("androidx.lifecycle:lifecycle-viewmodel-ktx:2.2.0")
 kapt("androidx.lifecycle:lifecycle-compiler:2.2.0")

 // image loading
 implementation ("com.github.bumptech.glide:glide:4.16.0")
}
o (GroceryItems.kt)
The entity class defines the database table structure. Annotate it with @Entity(tableName = "table_name") and use @ColumnInfo for column details. Define a primary key with auto-increment.
o (GroceryDao.kt)
The DAO interface contains database operations and is annotated with @Dao. Use suspend functions with:
@Insert to add items@Delete to remove items@Query("SELECT * FROM table_name") to retrieve all itemso (GroceryDatabase.kt)
Define the database class with
@Database(entities = [GroceryItems::class], version = 1)Extend RoomDatabase and create an abstract function to get the DAO instance.
o (GroceryRepository.kt)
The repository acts as a data provider for the ViewModel. It fetches data locally from Room or remotely if needed. We create an instance of the database (db) inside this class.
o (GroceryViewModel.kt)
The ViewModel serves as a bridge between the UI and the data. It extends ViewModel and takes a repository instance as a constructor parameter.
o (GroceryViewModelFactory.kt)
Since GroceryViewModel requires a repository instance in its constructor, we create a ViewModelFactory. This class extends ViewModelProvider.NewInstanceFactory and provides GroceryViewModel.
Add the following drawable to help in design. Navigate to app > res > drawable and add the following xml files by right clicking on the drawable folder and selecting New > Drawable Resource File.
The main layout contains two ImageView, a RecyclerView to display grocery items, and a Button to open a dialog box for item input.
This file defines the layout for each grocery item in the list, including fields for name, quantity, and price. Navigate to app > res > layout and a file named item_grocery.xml
The adapter class manages the grocery list using RecyclerView.Adapter. It stores the entity list, uses a ViewModel instance, and overrides onCreateViewHolder, onBindViewHolder, and getItemCount. It also includes an inner ViewHolder class. Navigate to app > kotlin+java > {package_name} > Adapter and create a class named GroceryAdapter.kt
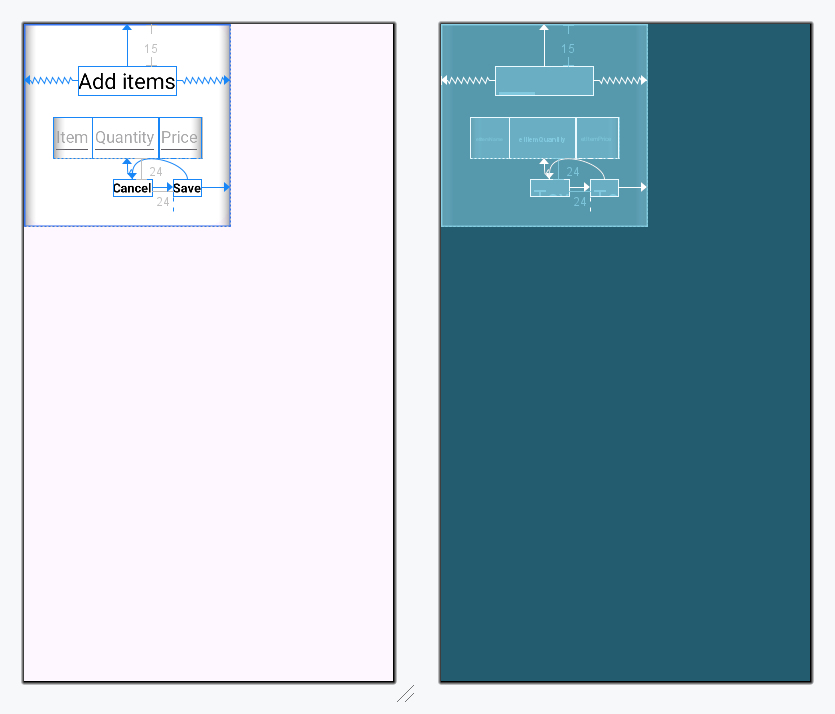
Design UI:
Create a layout file for the dialog box with three EditText fields for item name, quantity, and price, along with two TextView elements for "Save" and "Cancel". Clicking "Save" stores the data in the database, while clicking "Cancel" closes the dialog. Navigate to app > res > layout and create a layout file named grocerydialog.xml.
Define an interface with a function to handle the "Save" action in the dialog. Navigate to app > kotlin+java > {package_name} and create a file named DialogListener.kt.
Create a class named GroceryItemDialog.kt to handle user input from the dialog, store values in variables, and insert data into the database.
Design UI:
In this step finally we will code in our MainActivity. In our main activity, we have to set up the recycler view and add click listener on add button to open the dialog box. Go to the MainActivity.kt file and refer to the following code. Below is the code for the MainActivity.kt file. Comments are added inside the code to understand the code in more detail.
Refer to the following Github repo to get the entire code:https://github.com/geeksforgeeksorg/Grocery-Android-App