 |
VOOZH | about |
|
VOOZH | about |
Firebase UI is a library provided by Firebase for Android apps which makes or so many tasks easy while integrating Firebase in Android. This library provides so many extra features that we can integrate into our Android very easily. In this article, we will take a look at using this library for adding authentication in our Android apps.
Using this library we are simply creating an application in which we will be asking users to sign in using different login options such as Google, Email and password, and Phone number. After successful authentication of our user. We will redirect our user to a new screen where we will be displaying a simple welcome message to our user. Inside that screen, we will be adding a simple button that will be used to Log out the user from the application and redirects that user to the login screen for authentication. Below is the GIF in which you will get to know what we are going to build in this application. Note that we are going to implement this project using the Java language.
1) Phone Authentication
2) Email authentication
3) Google Authentication
Step 1: Create a new Android Studio Project
To create a new project in Android Studio please refer to How to Create/Start a New Project in Android Studio. Note that select Java as the programming language.
Step 2: Connect your app to Firebase
After creating a new project in Android Studio. Connect your app to Firebase. For connecting your app to firebase. Navigate to Tools on the top bar. After that click on Firebase. A new window will open on the right side. Inside that window click on Authentication and then email and password authentication.
After clicking on email and password authentication you will get to see the below screen. Inside this screen click on the first option connect to firebase and after that click on the second option to add Firebase authentication to your app.
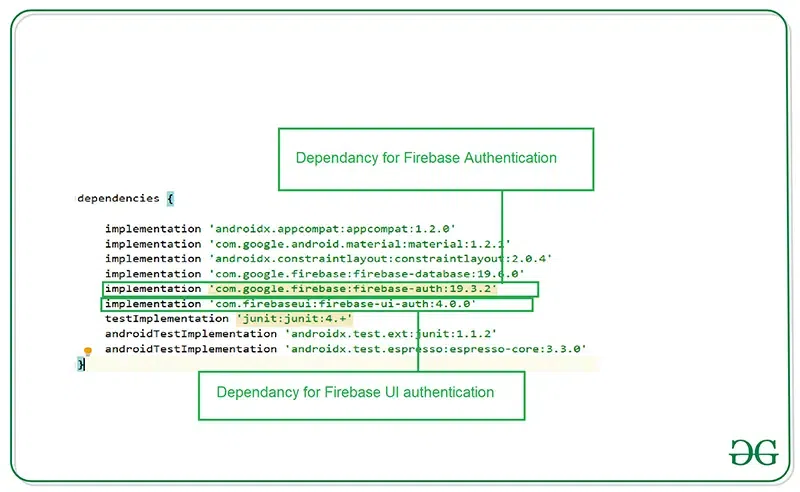
Step 3: Add thebelow dependency to build.gradle file
implementation 'com.firebaseui:firebase-ui-auth:4.0.0'
Your Gradle files should be having the below dependencies present in the dependencies section.
Step 4: Add Internet permissions in the AndroidManifest.xml file
Navigate to the app > AndroidManifest.xml file inside that file add permission for the Internet. Add below lines in the AndroidManifest.xml file.
Step 5: Working with the activity_main.xml file
You don't have to add any type of view inside your activity_main.xml because we will be getting our UI from Firebase UI dependency itself we will be only customizing that UI according to our requirement. Navigate to the app > res > layout > activity_main.xml and add the below code to it.
Step 6: Creating a new Activity for our Home Screen
Navigate to the app > java > your app's package name > Right-click on it and then click on New > Empty Activity and give a name to your activity. Here we have given the name as HomeActivity.
Step 7: Creating a custom style for our Login Screen UI
We will be using a custom style for UI so we have created a custom style for our UI. For adding styles to your Login UI. Navigate to app > res > values > themes.xml and add the below code to it inside the <resources> tag.
Step 8: Working with the MainActivity.java file
Go to the MainActivity.java file and refer to the following code. Below is the code for the MainActivity.java file. Comments are added inside the code to understand the code in more detail.
Step 9: Working with the activity_home.xml file
Go to the activity_home.xml file and refer to the following code. Below is the code for the activity_home.xml file.
Step 10: Working with the HomeActivity.java file
Go to the HomeActivity.java file and refer to the following code. Below is the code for the HomeActivity.java file. Comments are added inside the code to understand the code in more detail.
Step 11: Enable authentication providers in Firebase Console
For enabling Phone authentication in the Firebase console. Go to the Firebase Console. Now click on Go to Console option and navigate to your project. After that click on your project. You can get to see the below screen.
After clicking on Authentication you will get to see the below screen. On this screen click on the Sign-in method tab.
After clicking on the Sign in-method you will get to see below the list of authentication screens. Click on the Email and password option and enable it.
Click on the Email password option and you will get to see the below pop-up screen. Inside this screen click on the enable option and save it.
Now similarly click on the Phone option as shown below
Now you will get to see the below option after clicking on phone authentication enable phone authentication and save it.
Now we will enable Google Authentication by enabling it simply click on the Google option from the list.
After clicking on the Google option you will get to see the below pop-up message click on enable it and save it.
After enabling all authentication methods you will get to see the below screen with authentication.
After enabling this option in Firebase Console. Now run your app and test all the authentication. You can get to see the output in the below screen.
We have created three videos for output in which we have shown each authentication.
1) TheFirst one is for Google Sig In Option
2) The Second one is for authentication using a phone number
3) The Third one is using Email and password authentication
GitHub Link:https://github.com/ChaitanyaMunje/FirebasePhoneAuthentication/tree/FirebaseUIAuthentication