How to Build a Simple Augmented Reality Android App?
Last Updated : 27 Sep, 2025
Augmented Reality has crossed a long way from Sci-fi Stories to Scientific reality. With this speed of technical advancement, it's probably not very far when we can also manipulate digital data in this real physical world as Tony Stark did in his lab. When we superimpose information like sound, text, image to our real-world and also can interact with it through a special medium, that is Augmented Reality. The world-famous "Pokemon GO" app is just another example of an Augmented Reality Application. Let's make a very simple Augmented Reality App in Android Studio using JAVA. This app shows a custom made or downloaded 3d model using the phone camera. A sample GIF is given below to get an idea about what we are going to do in this article.
Terminologies
ARCore: According to Google, ARCore is a platform for Augmented Reality. ARCore actually helps the phone to sense its environment and interact with the world. ARCore mainly uses 3 key principles - Motion Tracking, Understanding Environment, and Light Estimation. Here is a list provided by Google, of the phones that supports ARCore.
Sceneform: According to Google, Sceneform is a 3d framework, that helps the developers to build ARCore apps without knowing a lot about OpenGL. Sceneform comes with a lot of features like checking for camera permission, manipulating 3d assets, and a lot more.
Sceneform 1.16.0 supports only glTF files. glTF means GL Transmission Format. Now .glb files are a binary version of the GL Transmission Format. These types of 3d model files are used in VR, AR because it supports motion and animation.
For the 3d model, you have to get a .glb file.
There are two ways, you can grab a 3d model, download from the web, or make one yourself.
If you want to download it from the web, go to this awesome 3d models repository by Google, poly, and search for any glb file. Download any one of them for your project.
OR, get a 3D computer graphics software and make a 3d model yourself.
I used Blender which is completely free to download and made a 3d model of GEEKS FOR GEEKS text. Get this file from here.
Export the model as a .glb file to a specific folder and the filename must contain small_letters or numbers.
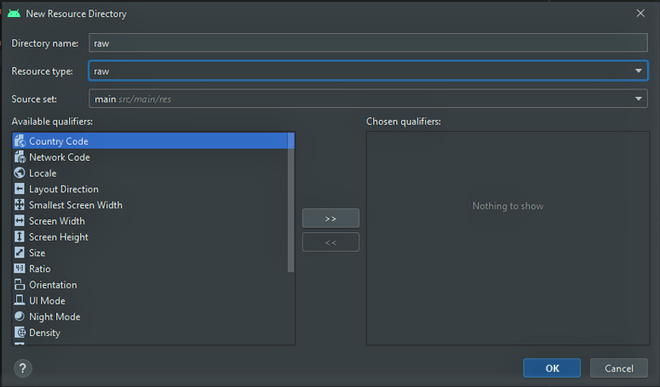
Copy the .glb file from that directory where you saved it and paste it under the raw folder.
Step 3: Downloading and Setting up SceneForm 1.16.0
Well, for AR apps we need Sceneform SDK. SceneForm 1.15.0 is very famous but recently, there are some plugin errors I faced while getting the "Google Sceneform Tools (Beta)" plugin in the latest Android Studio 4.1. So here I am, using the Sceneform 1.16.0 SDK and setting it up manually.
Then go to the app > manifests > AndroidManifest.xml
Add these lines before the "application" block:
After that add this line before the "activity" block.
Below is the complete code for the AndroidManifest.xml file.
Step 4: Error Correction
Now comes a little boring part. The downloaded folders sceneformsrc and sceneformux contains some java file, that imports the java classes from an older android.support. So, now if you build the project you will see a lot of errors because of that. What you can do now is to migrate your project to the new Androidx. Now, you can find a way to migrate your whole project to Androidx or you can change the imports manually one by one. I know this is boring, but good things come to those who wait, right?
Go to Build > Rebuild Project
You'll find loads of errors. So down in the 'Build' section double-click on the package import error. A code will open with the error section highlighted.
You need to change only three types of import path, given below, whenever you see the first-one change it to second-one:
You have to continue this till there are no more errors.
Step 5: Working with the activity_main.xmlfile
Go to the res > layout > activity_main.xml file.
Here is the code of that XML file:
ArFragment contains a lot of features itself like it asks you to download ARCore if it's already not installed in your phone or like it asks for the camera permission if it's not already granted. So ArFragment is the best thing to use here.
After writing this code, the App UI will look like this:
Go to java > com.wheic.arapp(your's may differ) > MainActivity.java
In the MainActivity class, first, we have to make an object of ArFragment.
Now, let's create a hardware check function outside the onCreate() function. This function will check whether your phone's hardware meets all the systemic requirements to run this AR App. It's going to check:
Is the API version of the running Android >= 24 that means Android Nougat 7.0
Is the OpenGL version >= 3.0
Having these is mandatory to run AR Applications using ARCore and Sceneform. Here is the code of that function:
Inside the onCreate() function first, we need to check the phone's hardware. If it returns true, then the rest of the function will execute.
Now the ArFragment is linked up with its respective id used in the activity_main.xml.
An onTapListener is called, to show the 3d model, when we tap on the screen.
Inside the setOnTapArPlaneListener, an Anchor object is created. Anchor actually helps to bring virtual objects on the screen and make them stay at the same position and orientation in the space.
Now a ModelRenderable class is used with a bunch of functions. This class is used to render the downloaded or created 3d model by attaching it to an AnchorNode.
setSource() function helps to get the source of the 3d model.
setIsFilamentGltf() function checks whether it is a glb file.
build() function renders the model.
A function is called inside thenAccept() function to receive the model by attaching an AnchorNode with the ModelRenderable.
exceptionally() function throws an exception if something goes wrong while building the model.
Now, let's see what's in the addModel() function:
It takes two parameters, the first one is Anchor and the other one is ModelRenderable.
An AnchorNode object is created. It is the root node of the scene. AnchorNode automatically positioned in the world, based on the Anchor.
TransformableNode helps the user to interact with the 3d model, like changing position, resize, rotate, etc.
Here is the complete code of the MainActivity.java file. Comments are added inside the code to understand the code in more detail.
Output: Run on a Physical Device
Finally, we built a simple Augmented Reality app using Android Studio. You can check this project in this GitHub link.

-300.png)
-300.png)
-300.png)
-300.png)