 |
VOOZH | about |
|
VOOZH | about |
This is a TODO application made on android studio IDE, code is written in JAVA, and data store in AWS DynamoDB and fetch to the home screen. The connection established between the application and AWS through Amplify CLI and the data is successful gets stored by creating a TODO Table in DynamoDB, a Schema is also created which shows the structure of data. The data fetched successfully and displayed on the home page of the application. The aim of this project is to show how to connect your android applications with AWS and use the AWS resources(DynamoDB). A sample video is given below to get an idea about what we are going to do in this article.
Before jumping to the implementation have a look at the following terms.
Prerequisite: Install Node.js (version 10.x) install NPM (version 6.x), create an AWS account if you don't have one, install android studio (version 4.0 or higher), android SDK API level 29(android 10), install amplify CLI (write following on the command prompt).
npm install -g @aws-amplify/cli
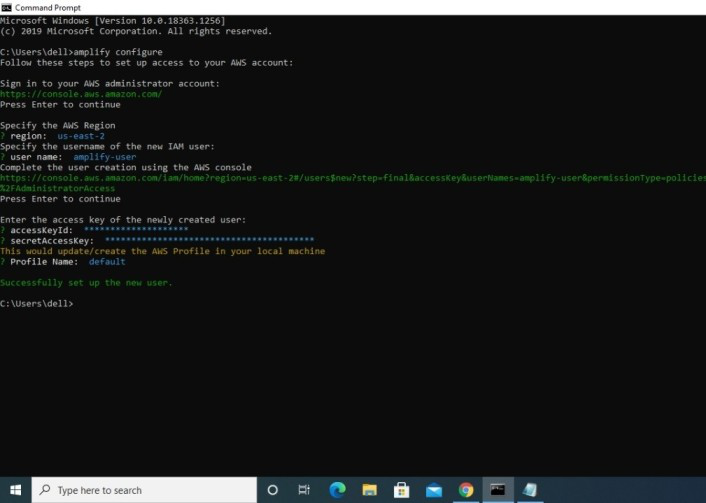
Step 1: Write the following on the command prompt
amplify configure
Step 2: If you have already created an IAM user then write "Do you want to use an AWS profile? Yes" and then write below its accessKeyId and secretAccessKey otherwise write "Do you want to use an AWS profile? No" create an IAM user and use its accessKeyId and secretAccessKey.
Step 3: Write the following in order to initialize the new Amplify project
amplify init
Step 4: Create backend API by using GraphQL query language then use "amplify publish" to deploy it
amplify add api
amplify push
amplify publish
Step 1: Add the following in the dependencies of build.gradle (Project: Todo) in Gradle Scripts
buildscript {
 repositories {
 google()
 jcenter()
 }

 dependencies {
 classpath 'com.android.tools.build:gradle:4.1.1'

 // Add this line into `dependencies` in `buildscript`
 classpath 'com.amplifyframework:amplify-tools-gradle-plugin:1.0.2'
 }
}

allprojects {
 repositories {
 google()
 jcenter()
 }
}

// Add this line at the end of the file
apply plugin: 'com.amplifyframework.amplifytools'
Step 2: Add the following in the dependencies of build.gradle (Module: app) in Gradle Scripts. Run Gradle Sync
dependencies {
 implementation 'com.amplifyframework:aws-api:1.6.9'
 implementation 'com.amplifyframework:aws-datastore:1.6.9'
}
Step 3: In android studio go to Project -> amplify -> app -> backend -> api -> schema.graphql
type Todo @model {
 id: ID!
 name: String!
 description: String
}
Step 4: Add the following code in MainActivity & MainActivity2 in the onCreate() method to initialize Amplify
 try {
 Amplify.addPlugin(new AWSDataStorePlugin());
 Amplify.configure(getApplicationContext());

 Log.i("Tutorial", "Initialized Amplify");
 } catch (AmplifyException e) {
 Log.e("Tutorial", "Could not initialize Amplify", e);
 }
Step 5: Add the following code in MainActivity2 in the onCreate() method to creates a Todo item with two properties: a name and a description
 Todo todo = Todo.builder()
 .name(name1)
 .description(name2)
 .build();
Step 6: Add the following code in MainActivity2 in the onCreate() method to save items using mutate
 Amplify.API.mutate(
 ModelMutation.create(todo),
 response -> Log.i("MyAmplifyApp", "Added Todo with id: " + response.getData().getId()),
 error -> Log.e("MyAmplifyApp", "Create failed", error)
 );
Go to your AWS management console -> AppSync -> Select your API -> Data Sources -> select todo table -> items
Step 7: Add the following code in MainActivity in the onCreate() method to fetch data/run queries to retrieve the stored data
 Amplify.API.query(
 ModelQuery.list(Todo.class),
 response -> {
 for (Todo todo : response.getData()) {
 ls.add(todo.getName());
 Log.i("MyAmplifyApp", todo.getName());
 }
 },
 error -> Log.e("MyAmplifyApp", "Query failure", error)
);MainActivity file(Home page of App)
MainActivity2 file(Write notes page)
Source Code: https://github.com/shreya593/Shreyaawsapp