 |
VOOZH | about |
|
VOOZH | about |
Have you always wanted to make an Android app but got lost in the complexity of the Android Studio or the technical jargon used in the development process? Don't worry, you have come to the right place. We are going to help you get started with your first Android app.
👁 how to make an android appThe app that we are going to make will be a simple multi-screen app utilizing the concept of activities, where clicking on a button will take you to the next screen and vice versa. This simple app will serve as a good introduction to Android Studio and to the concepts of activities.
Android Studio is the official Integrated Development Environment (IDE) for Android application development. It is a robust tool for developing high-quality Android applications. It includes all of the necessary tools for developing Android apps and also for code development,testing, and deployment. Android Studio provides all of the tools needed for developers to create an Android app.
It is a popular IDE for producing high-quality Android applications, suitable for both beginners and advanced developers.
The Android app that we are going to make is going to be a simple, multi-screen app that will introduce you to the concept of activities. You won't need much coding to make this app, and if you follow the instructions, the app could be made very easily in an hour. So let's see the steps:
In the activity_main.xml file let us design the layout for the first screen.
activity_main.xml:
This XML code defines two TextView and a Button for the first screen layout in an Android app with the following specifications:
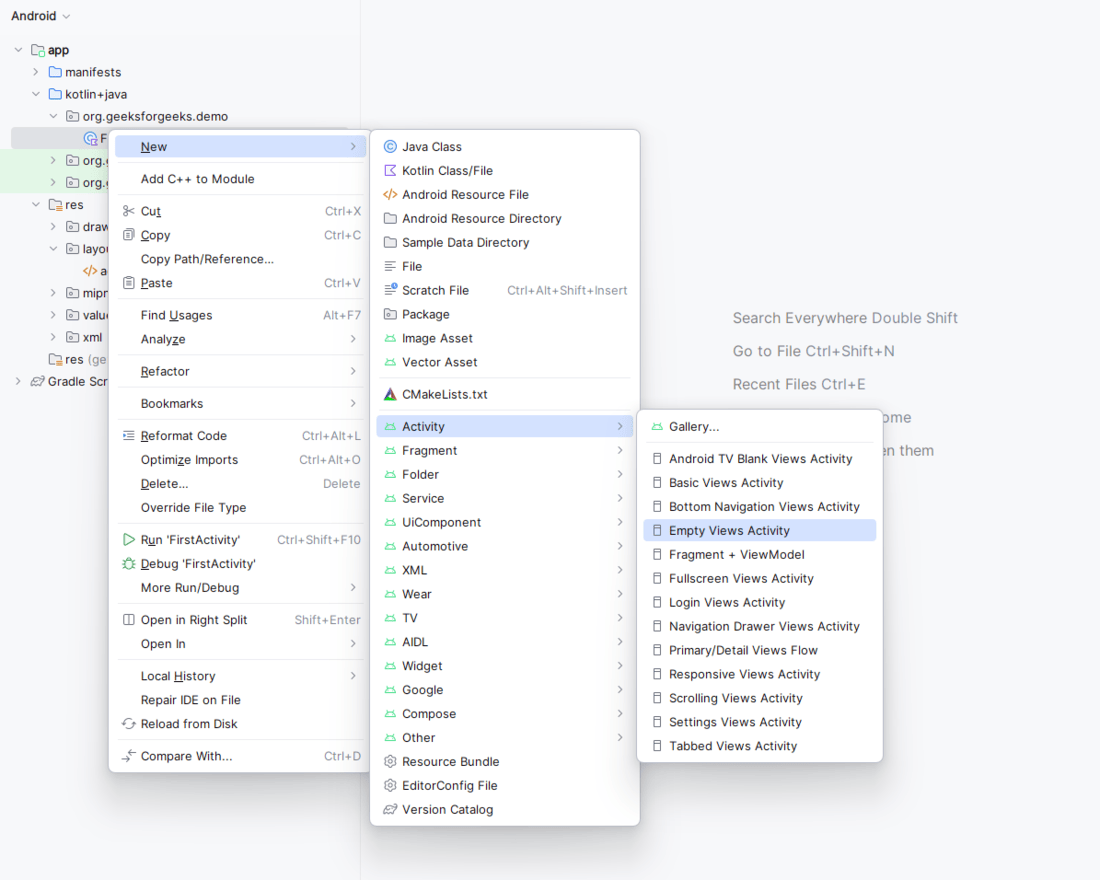
Create a new activity with the name SecondActivity. The below image shows how to create a new activity.
Then navigate to the XML layout file by navigating to app > res > layout > activity_second.xml and design the layout for the second screen. Add a TextView above the button, similar to the first screen layout.
activity_second.xml:
This XML code defines a Button and a TextView for the second screen layout in an Android app. The code specifies:
In MainActivity.kt, we implement the functionality for the first screen. In the first screen we are going to create the functionality that is when the user clicks the button he is taken to the second screen. Let us see the code for it in the file named MainActivity.kt.
MainActivity.kt:
In MainActivity.kt, we implement the functionality for the first screen. We get a reference to the button firstScreenButton using its ID with findViewById(). Then, we use a setOnClickListener to this button. When the button is clicked, the code inside the setOnClickListener block gets executed. Here, we create an intent to navigate to the second activity (SecondActivity) and start it using startActivity().
Now we are going create the file named SecondActivity.kt where we implement the functionality for the second screen. Similar to the first activity, when the user clicks the button he is taken to the first screen. Let us see the code for it in the file named SecondActivity.kt.
SecondActivity.kt:
In the above file, SecondActivity.kt, we are coding the behavior for the second screen of our app. Initially, we set the screen's layout using setContentView() to display the UI elements defined in activity_second.xml. Then, we access the secondScreenButton using findViewById() and attach an OnClickListener. When this button is clicked, we call finish() function. This function destroys the current activity navigates back to the screen on the top of the stack. This setup enables users to switch between screens by tapping the designated button on the second screen.
Check Out: Introduction to Activities in Android
When you successfully implement the above code, it will allow the app to have two screens, each with its own functionality and the ability to navigate between them. When the user clicks the button on the first screen, it takes them to the second screen, and clicking the button on the second screen takes them back to the first screen.
Also Read
We introduced you to how you can easily create a multi-screen app in Android Studio, teaching you the basics of activities. We have broken down the process into easy steps so that developers can quickly learn about basic ideas like activities, designing layouts, and moving around in Android Studio. By following these steps, even those with limited coding experience can build a functional app within an hour. The screens have basic text and a button to interconnect with the other screen, using which users can easily transition between different parts of the app. This simple Android app will serve as an accessible introduction to Android app development, solidifying the basics for beginners to create more complex applications.