 |
VOOZH | about |
|
VOOZH | about |
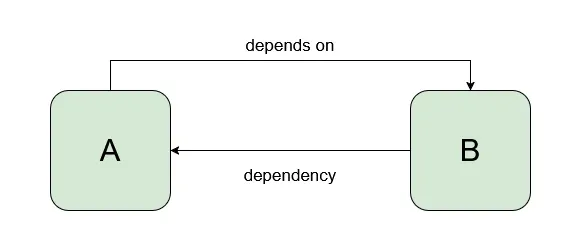
If there are two classes, class A and class B and class A depends on class B then class B is called dependent for class A.
So, Every time we want to access class B in class A we need to create an instance of class B in Class A or use static factory methods to access class A. But this will make our code tight coupled, difficult to manage, and test. In order to remove these problems, we use dependency injection. Dependency Injection is a design pattern that removes the dependency from the programming code and makes the application easy to manage and test. It also makes programming code loosely coupled.
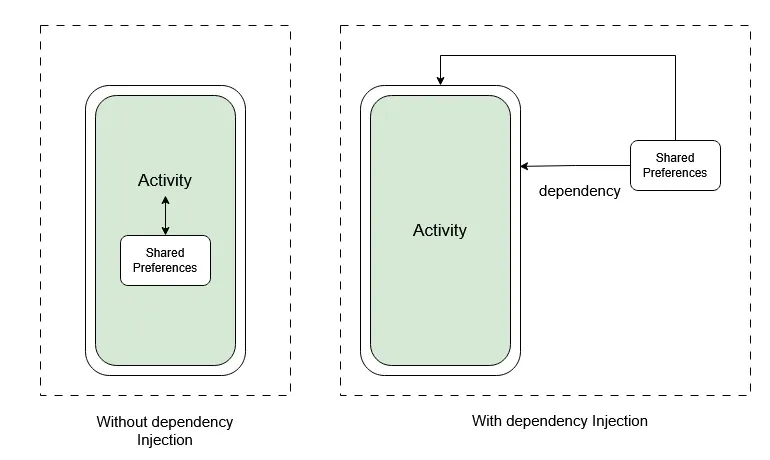
Let us assume, we want to store some data in SharedPreferences. In order to save or retrieve shared preferences data, we need the instance of shared preference in our Activity's boilerplate code. And it may lead to problems in testing, managing, etc. if our codebase is large. This is where Android Dependency Injection helps. Here, SharedPreferences acts as a dependency for our Activity so, we don't create its instance in our activity rather we inject it from some other class.
Below is an illustration of the situation.
Dagger 2 is a compile-time android dependency injection framework that uses Java Specification Request 330 and Annotations. Some of the basic annotations that are used in dagger 2 are:
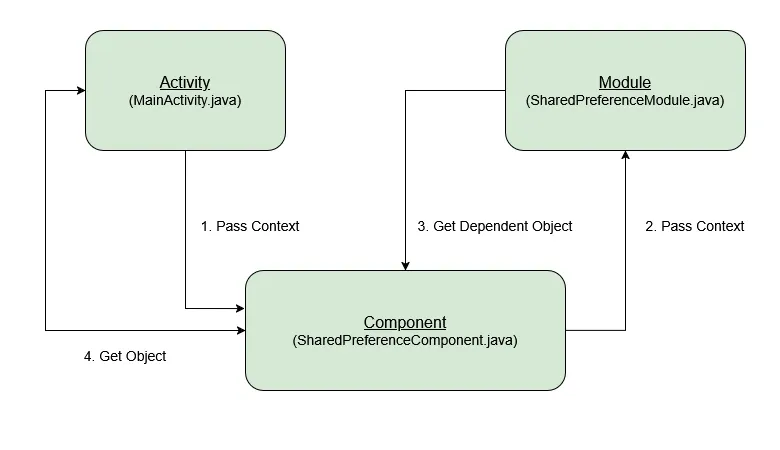
In this example, we will add some data to shared preferences and then retrieve it from there using the dagger 2 library. Below is the picture of what we are going to do in this example.
Note that we are going to implement this project using the Java language.
To create a new project in Android Studio please refer to How to Create/Start a New Project in Android Studio.
Note that select Java as the programming language.
In order to use dependency injection with the help of dagger 2 libraries, we need to add it's dependency. Go to Gradle Scripts > build.gradle(Module: app) and add the following dependencies. After adding these dependencies you need to click on Sync Now.
dependencies {
  implementation ("com.google.dagger:dagger:2.45")
 annotationProcessor ("com.google.dagger:dagger-compiler:2.45")

 // For Kotlin
 kapt ("com.google.dagger:dagger-compiler:2.45")
 kapt("androidx.room:room-compiler:2.6.1")
}
For Kotlin:
plugins {
 id 'kotlin-kapt'
}
In this step, we will create a layout file for the application. We have used EditText for taking the input from the user and a TextView for presenting the output and save and show buttons respectively. Below is the code snippet for the activity_main.xml file.
activity_main.xml:
Now, we will create a Module class which is used to construct the object and provide the dependencies. @Module annotations are used over the module class. This class contains a constructor that will initialize the context and a method that will return the dependent object for which @Provides annotation is used. Here, provideSharedPreferences() method will return the dependent object. In general, the method that returns the dependent object will be followed by the word provide. Go to the app > java > package > right-click and create a new java class and name it as SharedPreferenceModule.
Below is the code snippet for the SharedPreferenceModule file.
In this step, we will create an Interface. Go to the app > java > package > right-click and create an interface and name it as SharedPreferenceComponent. We use @Component annotation in order to mention all the modules.
@Component(modules={SharedPreferenceModule})
The Activities, Fragments,or Services that may request the dependencies declared by modules must be declared in this interface with the individual inject() method. Below is the code snippet for the SharedPreferenceComponent Interface.
In this step, we will first initialize our Views and then bind Dagger to our application. For which component-interface is followed by the Dagger keyword.
sharedPreferenceComponent = DaggerSharedPreferenceComponent.builder().sharedPreferenceModule(new SharedPreferenceModule(this)).build();
sharedPreferenceComponent.inject(this);
Below is the code snippet for the MainActivity file.
Note: When you will use Dagger as a prefix with Component(here, SharedPreferenceComponent) sometimes you may get an error or warning this is because DaggerSharedPreferenceComponent is generated after compilation.