 |
VOOZH | about |
|
VOOZH | about |
The navigation drawer is the most common feature offered by Android and the navigation drawer is a UI panel that shows your app's main navigation menu. It is also one of the important UI elements, which provides actions preferable to the users, for example changing the user profile, changing the settings of the application, etc. In this article, it has been discussed step by step to implement the navigation drawer in Android. The code has been given in both Java and Kotlin Programming Language for Android.
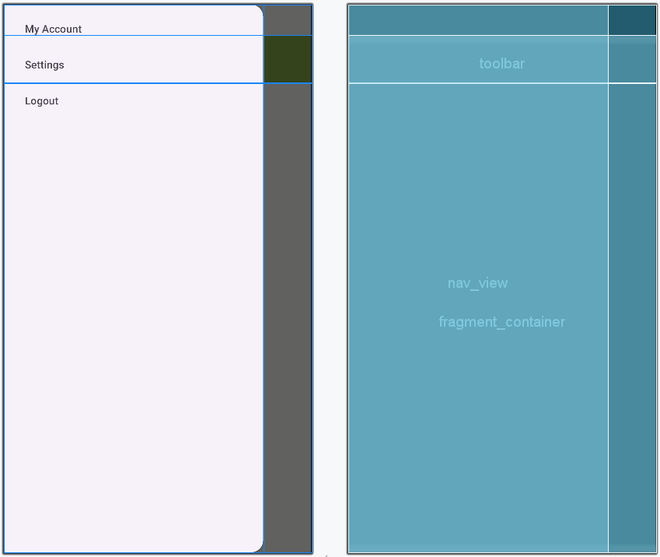
The navigation drawer slides in from the left and contains the navigation destinations for the app.
The user can view the navigation drawer when the user swipes a finger from the left edge of the activity. They can also find it from the home activity by tapping the app icon in the action bar. The drawer icon is displayed on all top-level destinations that use a DrawerLayout. Have a look at the following image to get an idea about the Navigation drawer.
Create an empty activity android studio project.
Refer to Android | How to Create/Start a New Project in Android Studio? on how to create an empty activity android studio project.
In this discussion, we are going to use the Material Design Navigation drawer. So add the following Material design dependency to the app-level Gradle file.
implementation 'com.google.android.material:material:1.3.0-alpha03'Refer to the following image if unable to locate the app-level Gradle file that invokes the dependency (under project hierarchy view). After invoking the dependency click on the "Sync Now " button. Make sure the system is connected to the network so that Android Studio downloads the required files.
Create the menu folder under the res folder. To implement the menu. Refer to the following video to create the layout to implement the menu.
navigation_menu.xml:
Invoke the following code in the activity_main.xml to set up the basic things required for the Navigation Drawer.
One thing to be noticed is that the menu drawer icon is still not appeared on the action bar. We need to set the icon and its open-close functionality programmatically.
Invoke the following code in the app/res/values/strings.xml file.
Below is the implementation of MainActivity File: