 |
VOOZH | about |
|
VOOZH | about |
UI testing is the process of testing the visual elements of an application to ensure whether they appropriately meet the anticipated functionality. Verifying the application manually whether it works or not is a time taking and tiring process, but using espresso we can write automated tests that run fast and scale well. Espresso is an automated user interface testing framework for Android, developed by Google in 2013. In this article, we will be discussing
Anatomy of a UI Test
Espresso consists of mainly three components:
Since espresso takes care of synchronization with any UI events, we don't have to worry about any view state transitions and implementation details. Now let's have a look at the boilerplate code for running an automated test.
onView(ViewMatcher) // onView takes a viewMatcher like R.id.button
 .perform(ViewAction) // perform takes a viewAction like pressing the button
 .check(ViewAssertion); // check inspects if the output result is same as the expected result.
In this article, we will be using only certain types of ViewMatchers, ViewActions, and ViewAssertions, however, there are many more of them which can be found on the official website https://developer.android.com/training/testing/espresso/cheat-sheet
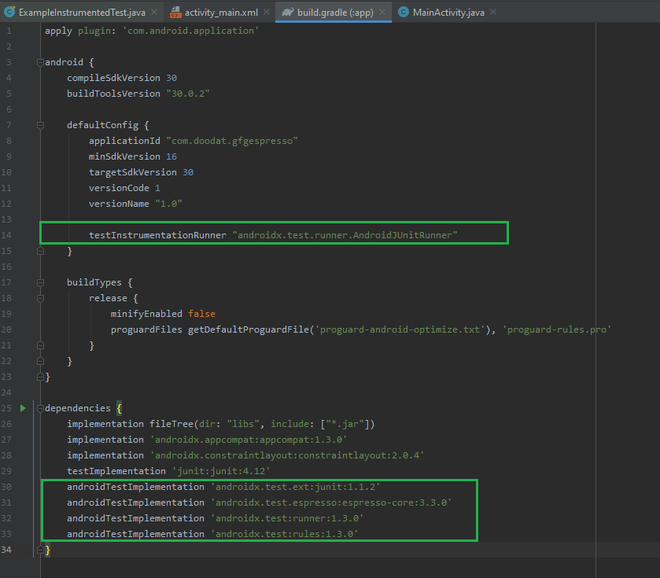
Step 1: Add the espresso library in dependencies
Navigate to app > Gradle Script > build.gradle (Module:app), add the following lines of code, and sync the project.
defaultConfig {
 testInstrumentationRunner "androidx.test.runner.AndroidJUnitRunner"
}
dependencies {
androidTestImplementation 'androidx.test.ext:junit:1.1.2'
androidTestImplementation 'androidx.test.espresso:espresso-core:3.3.0'
androidTestImplementation 'androidx.test:runner:1.3.0'
androidTestImplementation 'androidx.test:rules:1.3.0'
}👁 ImageStep 2: Turn off animations from the Android device
Navigate to Settings > Developer options and turn off the following options:
We will be building an application where a user can choose his preferred language, and the chosen language is displayed in the textView. Now, we will be implementing an automated test to validate if the chosen preferred language of the user is displayed in the TextView or not. A sample GIF is given below to get an idea about what we are going to do in this part.
Step 1: Create a New Project
To create a new project in Android Studio please refer to https://www.geeksforgeeks.org/android/how-to-create-start-a-new-project-in-android-studio/. Note that select Java as the programming language.
Step 2: Set up the espresso framework in Android as discussed in part 2 above.
Step 3: Working with the activity_main.xml file
Navigate to the app > res > layout > activity_main.xml and add the below code to that file. Below is the code for the activity_main.xml file.
Step 4: Working with the MainActivity.java file
Go to the MainActivity.java file and refer to the following code. Below is the code for the MainActivity.java file.
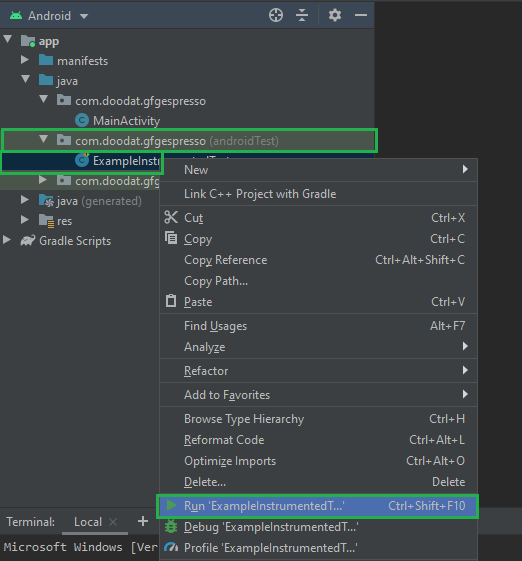
Step 5: Navigate to app > java > package-name(androidTest) > ExampleInstrumentedTest. Open the ExampleInstrumentedTest.java file and refer to the following code. Below is the code for the ExampleInstrumentedTest.java file. Comments are added to describe ViewMatchers, ViewActions, and ViewAssertions in the following code snippet.
Step 6 : Navigate to app > java > package-name(androidTest) > ExampleInstrumentedTest > Right Click and choose Run ExampleInstrumentedTest. This will run an automated test on an emulator/physical device and the result will be shown in the console once the test reaches completion.
👁 ImageOutput: The test case is passed and it took only 666ms to run an automated test. This shows the espresso library can be quite handy when we need to test the UI elements in an application even on a very large scale. A slow-motion video of the test case is attached below since automated tests are quite fast.
👁 ImageGitHub Repository: https://github.com/garg-lucifer/GFGespresso