 |
VOOZH | about |
|
VOOZH | about |
Radio buttons in React Native allow users to select one option from multiple choices. They are commonly used in forms, settings, and surveys where only a single selection is allowed. We will implement this using the Expo CLI for quick and easy setup.
Now, create a project with the following command.
npx create-expo-app app-name --templateNote: Replace the app-name with your app name for example : react-native-demo-app
Next, you might be asked to choose a template. Select one based on your preference as shown in the image below. I am selecting the blank template because it will generate a minimal app, as clean as an empty canvas in JavaScript.
It completes the project creation and displays a message: "Your Project is ready!" as shown in the image below.
Now go into your project folder, i.e., react-native-demo
cd app-nameStart the server by using the following command.
npx expo startThen, the application will display a QR code.
1. For the Android users,
2. For iOS users, simply scan the QR code using the Camera app.
3. If you're using a web browser, it will provide a local host link that you can use as mentioned in the image below.
Example 1: Here, we are going to use the React Native Paper library to create the radio button in react native.
- Import libraries: Import required libraries at the top of the file.
- StyleSheet: Create a StyleSheet to style components like container, radioGroup, radioButton, and radioLabel.
- RadioButton.Android and Text: RadioButton.Android is used to create a radio button in android and Text is to display the text beside it, i.e View component like a row.
- useState: Used to maintain the state, i.e, selectedValue and set the default value to 'option1'.
- App Component: Wrap the all RadioButton.Android and Text with a View and return that inside the App function to render and place the useState inside the App function, also make sure to export the App.
App.js:
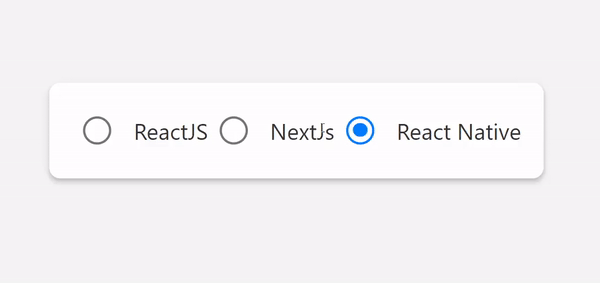
Output
👁 How-To-Implement-Radio-Button-In-React-Native
Example 2: Upon selection of an option, the background color changes to a vibrant blue while ensuring optimal text contrast for improved visibility.
- Import libraries: Import required libraries at the top of the file.
- StyleSheet: Create a StyleSheet to style components like a container, a radioButton, and radioButtonText.
- CustomRadioButton: Create a "CustomRadioButton" to display a button with a label and change its style based on selection.
- useState: It is used to manage the state i.e, selectedValue value and set the default value of selectedValue to null.
- App Component: Wrap the CustomRadioButton with a View and return that inside the App function to render and place the useState inside the App function, also make sure to export the App.
App.js:
Output: