 |
VOOZH | about |
|
VOOZH | about |
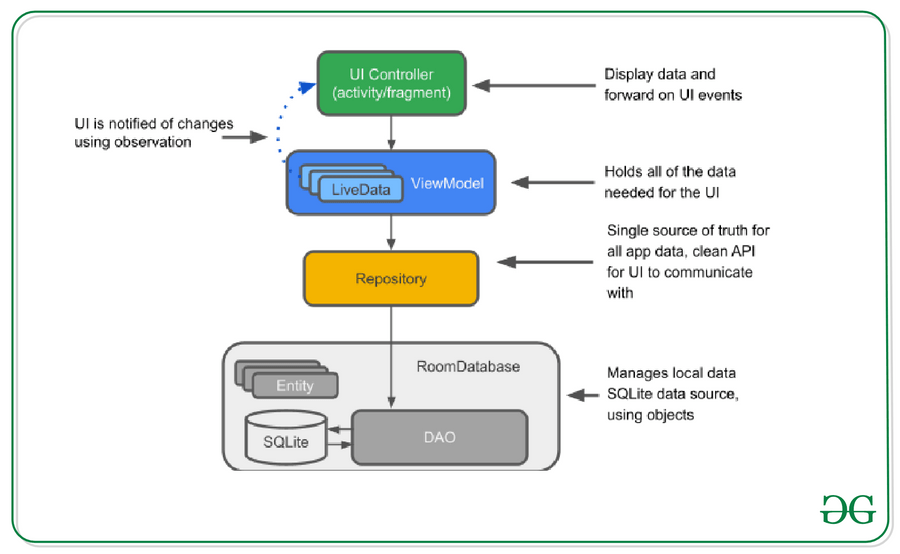
Android provides us a feature with which we can store users' data inside their mobile itself with different storage options such as Shared Preferences, SQLite database, and the Room Database. All the data storing techniques are having different use cases. In this article, we will specifically take a look at using a Room Database with Architecture Components in Android. In this article, we will be specifically looking at components such as LiveData, ViewModel, and Room. We can get to see the explanation of each component in detail. Below is the guide for it.
The components which we will be using inside the application are listed below with a detailed explanation :
We will be building a simple Notes Application in which we will be displaying the list of notes in Recycler View which is added by the user. Along with that, we will be also able to add a new note to your app. We will be using Room Database for storing data in users' devices. Below is the video in which we will get to see what we are going to build in this article. Note that we are going to implement this project using the Kotlin language.
To create a new project in Android Studio please refer to How to Create/Start a New Project in Android Studio.
Note that select Kotlin as the programming language.
Navigate to the Gradle Scripts > build.gradle.kts (Module :app) and inside that, in the first plugins section, we have to add id for one more plugin. Below is the code for all the plugins which are present inside our build.gradle.kts.
plugins {
 ...
 id("kotlin-kapt")
}
Now add the below dependencies inside your build.gradle.kts file. We have to simply update the dependencies section with the below one.
dependencies {
 ...
 // Room components
 implementation ("androidx.room:room-ktx:2.7.0")
 kapt ("androidx.room:room-compiler:2.7.0")

 // Lifecycle components
 implementation ("androidx.lifecycle:lifecycle-viewmodel-ktx:2.8.7")
 implementation ("androidx.lifecycle:lifecycle-livedata-ktx:2.8.7")
}
After updating your gradle file. Now we have to sync your project and then we have to install all the dependencies inside the application by clicking on the sync now option at the top right corner.
Navigate to the app > res > values > colors.xml and add below colors to it.
colors.xml:
An Entity is basically a modal class or a structure of our database in which we will be used for creating a database structure. Inside our app, we will be having a simple table that will be only having two columns such as ID and a text. ID will be used for the identification of an entry and text is the column for the identification of text column. Below is the table structure for our database. Below is the image for the database.
For creating a new Entity, we have to create a new Kotlin class. For creating this we simply have to navigate to your app's package name. Right-click on it then new and select Kotlin File/Class and then specify the Class name as Note and add the below code to it. Comments are added in the code to get to know in more detail.
Note.kt:
DAO is a data access object which is used to specify SQL queries and then associate them with different method calls. DAO may be an abstract class or an interface. Inside the DAO class, we have to create different methods such as inserting, deleting the data, and reading the data from our database. So this class will basically interact with our database to add or delete data inside our database.
For creating a DAO interface we simply have to navigate to the app's package name, Right-click on it > New Kotlin File and we have to select as Interface and name it as NotesDao and we have to create this file. After creating this file we have to add the below code to it.
NotesDao.kt:
What is basically a Room Database?
Now to store data inside the user's device we have to create a Room database for storing the data. So for creating a database, we have to create an abstract class for creating our database. In this, we will be simply building our database using Room and we will be specifying our database name. For creating a new abstract class we have to go to the app's package name > Right-click on it > New > Kotlin file and we name it as NoteDatabase. After creating this class we have to add the below code to it. Comments are added in the code to get to know in more detail.
NoteDatabase.kt:
Repository class basically abstracts the access to multiple data sources such as getting the data from API or getting the data from Room database. A repository class will provides us a clean API for data access for the rest of the application. The repository will contain a logic that will be deciding whether we have to fetch the data from the network or we have to get the data from Database.
Creating a Repository Class. For creating a Repository we have to create a new Kotlin file by simply right-clicking on your app's package name > Right-click on it > New > Kotlin class and specify the class name as NoteRepository and add below code to it. Comments are added in the code to get to know in more detail.
NoteRepository.kt:
ViewModel is basically used for providing the data to our User Interface. It acts as a communication layer between Repository and the UI. We can use View Modal to share data between our fragments. For creating a View Modal we have to simply create a new Kotlin class and then we have to name it as NoteViewModel and add the below code to it. Comments are added in the code to get to know in more detail.
NoteViewModel.kt:
Now we will be working on the UI part of our application. Now we have to navigate to app > res > activity_main.xml and add the below code to it. Comments are added in the code to get to know in more detail.
Navigate to the app > res > layout > Right-click on it > New > Layout Resource file and name your file as note_rv_item and add the below code to it. Comments are added in the code to get to know in more detail.
Now we will be creating an adapter class that will be used for setting the data to each item of our recycler view. For creating an Adapter class, we have to navigate to the app > java > your app's package name > Right-click on it > New > Kotlin/Class and name it as NoteRVAdapter and add the below code to it. Comments are added in the code to get to know in more detail.
NoteRVAdapter.kt:
Navigate to the app > java > your app's package name > Right-click on it > New > select Empty Activity and name it as AddEditNoteActivity and create a new activity. After that navigate to the app > res > layout > activity_add_edit_note.xml file and add the below code to it. Comments are added in the code to get to know in more detail.
Navigate to the app > java > your app's package name > MainActivity.kt file and add the below code to it. Comments are added in the code to get to know in more detail.
MainActivity.kt:
Navigate to the app > java > your app's package name > AddEditNoteActivity.kt and add the below code to it. Comments are added in the code to get to know in more detail.
AddEditNoteActivity.kt:
Refer to the following github repo to get the entire code:Simple-Note-Android-App-using-MVVM-and-Room-Database